Latex Fashion Photoshoot, From Prep to Post
There is nothing in the world quite like the unmistakable shine of latex. It is more than just clothing. It is a unique medium for expression, offering a second-skin artistry, a high-gloss texture, and a feel that is simply unparalleled. Capturing this beauty in a photograph, however, is an art form in itself.
This guide is your complete workflow. It is designed for enthusiasts, models, and stylists who want to collaborate and create stunning images that truly celebrate the beauty of latex fashion. We will navigate the key elements that make a shoot successful, from brilliant lighting and proper garment care to model comfort and how to prevent tears.
I. Curating Your Vision
1. Concept and Mood Board
Define your theme and express your personal style. Are you aiming for a high-fashion editorial look, a futuristic sci-fi vibe, or a classic fetish-inspired portrait? Gather inspiration for poses, lighting, makeup, and styling that speak to you. A mood board is useful for this. Choose a color palette that complements your garments to tie the entire look together.
2. Assembling Your Creative Team
You need a solid team.
The Photographer: Find a collaborator who understands latex. They must be comfortable lighting reflective surfaces and managing reflections. Review their portfolio first.
The Model: This might be you, or it might be someone you are working with. The key is finding someone who embodies the theme and is comfortable wearing latex.
MUA and Hair: Plan for smudge-proof, long-lasting looks. Specify oil-free and solvent-free products. Oil-based makeup and some hairsprays can stain, soften, or contaminate latex, so clear communication is essential.
Latex Dresser or Assistant: Having someone dedicated to handling, shining, and assisting the model reduces stress and prevents damage.
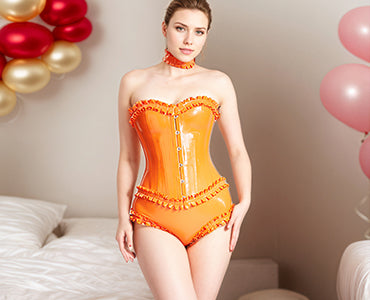
3. The Star of the Show, The Garment
Whether you are showcasing your collection or working with designers, the garment is the focal point. Precise measurements are non-negotiable for a flawless second-skin look. Common causes of tears include sharp objects or fingernails, excessive stress from overly tight areas, and material aging. Poor fit significantly increases the risk.
4. Location and Environment
Choose a space that complements the fashion.
Studio: Ideal for full control over light and reflections.
Temperature: Keep the space cool. Latex does not breathe, and a hot room becomes uncomfortable and unsafe.
Cleanliness: The set must be spotless. Dust will show on high-gloss finishes.
Private Changing Area: Required. The dressing process needs privacy, space, and time.

II. The Sacred Ritual, Latex Prep and Care
1. Appreciating the Material
Sheet latex and molded latex have different looks and fits. You also have a choice between chlorinated and unchlorinated latex. Chlorination is a chemical process that makes the latex silky and easier to put on without aids, and it tends to produce a satin or semi-matte surface. It can still be polished to a soft sheen, but it rarely reaches the mirror-like gloss of unchlorinated latex. Unchlorinated latex is the classic, slightly tacky material that requires dressing aids and can achieve a mirror-gloss finish with more maintenance.
2. The Latex Lover’s Toolkit
For a photoshoot, this kit is essential.
-
Shiner or Polish: Silicone-based brands such as Pjur, Vivishine, or BeGloss. Never use oil-based products.
-
Dressing Aids: Talcum powder for unchlorinated latex or a silicone-based dressing lube.
-
Cleaning Supplies: Prefer latex-specific cleaners. If using household soap, choose a neutral, fragrance-free, oil-free formula in low concentration.
-
Cloths: Many lint-free microfiber cloths.
-
Repair Kit: Latex cement and patches for on-set emergencies.
-
Gloves: Nitrile gloves for anyone handling shined garments to prevent fingerprints.
3. Prepping Your Prized Pieces
Before shoot day, inspect for weak spots, small tears, or seam stress. Ensure each piece is fully clean and dry from its last wearing. For transport, roll garments with acid-free tissue between layers and place them in opaque bags. Avoid colored tissue, printed papers, and PVC contact. Do not long-term fold. Short-term light folding or rolling for transport is acceptable.
III. Bringing the Vision to Life
1. Model Preparation
Arrive with completely clean skin. Avoid lotions, oils, and perfumes. If you must use deodorant or antiperspirant, apply it well before dressing, allow it to dry completely, and ensure it does not contact the latex. Remove sharp jewelry and smooth any sharp fingernail edges. Complete hair and makeup before dressing, and keep all oil-containing products away from the garment.
2. Getting Into Latex
Allow 30 to 60 minutes. Apply dressing aid liberally to skin or the garment interior. Roll latex onto the body rather than pulling it. Use flat palms and open hands to adjust fit. Avoid fingertips and nails. With zippers, go slowly and ensure the inner protective flap is placed correctly.
3. Achieving the Perfect Shine
Once dressed, apply shiner to a microfiber cloth, not directly to the garment. Polish with long, even strokes. Buff until streaks disappear and the shine is uniform.
4. Understanding the Light
The goal is to capture bright, liquid specular highlights that define latex.
Hard Light: Grids or bare strobes create sharp, defined reflections.
Soft Source with Control: Very large soft sources combined with black flags or cutters can produce elegant, long highlight bands with controlled speculars.
Rim Lighting: A light placed behind the subject separates the figure from background and carves the silhouette, especially useful for black latex on dark backgrounds.
Reflection Management: Latex reflects everything. Keep the set clean and place lights and flags to remove unwanted reflections.
5. Posing and Embodying the Look
Movement is restricted. Favor strong, sculptural poses that show fit and character. Comfort matters. Keep water with a straw nearby. Use fans to stay cool between shots. Schedule breaks to undress partially, cool down, and rest.
6. On-Set Maintenance
Continuously check for dust. Use a lint roller or slightly damp microfiber. Wipe visible sweat promptly. Re-polish areas that are dull or streak from posing.
IV. Styling and Expression
1. Beyond the Garment
Makeup: Bold, smudge-proof, and waterproof looks work best. Use oil-free and solvent-free formulas.
Hair: Sleek, structural, or dramatic hairstyles complement latex. Be mindful of products that could transfer oils or solvents.
2. Accessorizing Your Look
Choose accessories that are compatible with latex. Avoid sharp edges or unfinished metals. Be especially cautious with copper, brass, and nickel, which can stain light or translucent latex. High boots, gloves, safe-finished jewelry, and masks can elevate the theme.
3. Exploring Sub-Genres
Explore high-fashion minimalism, cyberpunk grit, pin-up, or gothic themes. Align styling, lighting, and posing to define the sub-genre.
V. The Final Polish, Retouching Essentials
1. Enhancement, Not Alteration
Enhance the reality of the garment and remove distractions so the material’s qualities are clear.
2. Retouching Checklist
Cleanliness: Remove dust specks and fingerprints.
Reflection Management: Reduce or remove distracting reflections without flattening texture.
Natural Smoothing: Reduce unflattering wrinkles or bunching without erasing the latex surface character.
Shine Enhancement: Make existing highlights pop without painting fake highlight stripes.
VI. Aftercare, Protecting Your Investment
1. Post-Shoot Bath
Wash immediately after the shoot. Use lukewarm water in a clean tub or basin. Prefer latex-specific cleaner or a small amount of neutral, fragrance-free, oil-free soap. Gently wash inside and out. Rinse thoroughly.
2. Drying with Patience
Hang to drip dry away from heat and sunlight using wide plastic hangers with shoulder support. Ensure the garment is completely dry, inside and out, before storage. For heavy garments or long-term storage, avoid prolonged hanging that can stretch shoulders or necklines.
3. Safe and Sound Storage
Lightly dust the interior with talcum powder to prevent self-adhesion. Avoid heavy powdering on the exterior, which reduces gloss and can leave haze. You can leave the exterior unpowdered and protect it with a polyethylene cover or a thin silicone protective film. Store each piece in its own opaque bag. Keep items cool, dark, and dry. Prefer thick plastic hangers or well-sealed and padded wooden hangers with no exposed metal. For some pieces, flat storage is preferable to prevent stretching. Keep away from metals, oils, and plastics like PVC.
Conclusion
Creating the perfect latex photograph rests on four pillars: a strong vision, patience, smart use of light, and meticulous aftercare. The challenges are real, and the reward is unique, powerful images that celebrate your passion for latex fashion.
Build your look with latex garments made your way. Customize size, color, and material. Choose from a complete range of styles at cost effective pricing. Set your specs, lock in your style, and order today.